맥북에 MySQL을 설치하는 방법은 크게 두 가지가 있습니다. 공식 사이트에서 직접 다운로드해서 설치하거나 Homebrew를 사용하여 설치할 수 있습니다.
이번 포스팅에서는 Homebrew를 사용하여 맥북에 MySQL 설치하는 방법에 대해서 알아보겠습니다.
맥북에 MySQL 설치
MySQL 설치하기 위해서 homebrew가 먼저 설치되어 있어야 합니다.
만약 Homebrew가 설치 안되어 있으면 다음 포스트를 참고하여 Homebrew를 설치해주세요
Homebrew 설치 및 사용 방법 – Studio YS
터미널을 열고 아래 명령어를 입력하여 MySQL을 설치합니다.
최신 버전의 MySQL을 설치하면 9.x 버전이 설치 되는데, 저는 8.4 버전을 설치하겠습니다.
( 설치하는 데 시간이 좀 걸립니다. )
brew install mysql@8.4
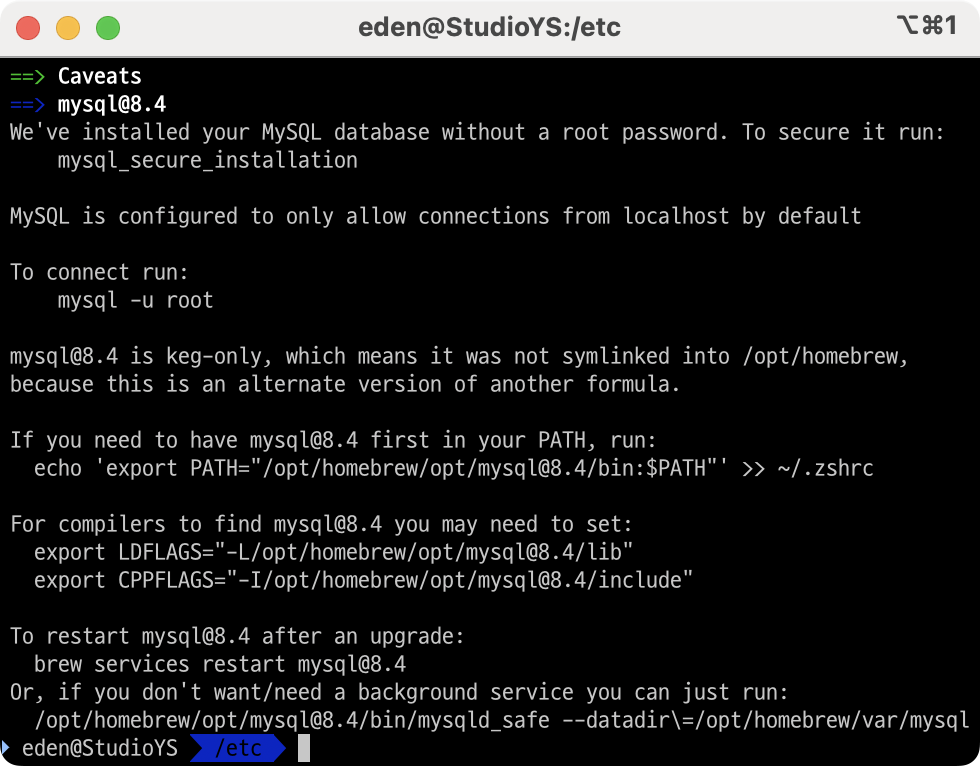
설치가 완료되었습니다. 위 그림에서와 같이 기본적으로 MySQL은 root 패스워드 없이 설치되며, localhost에서만 접속 가능하도록 설정됩니다.
맥북에서 개발용으로만 사용해서 root 패스워드 없이 사용하는 경우도 많이 있습니다.
서비스 등록하기
MySQL 설치가 완료되면 맥북 로그인 시 MySQL이 자동으로 시작되도록 서비스에 등록할 수 있습니다. 아래 명령어로 MySQL을 서비스로 등록하고 시작합니다.
brew services start mysql==> Tapping homebrew/services
Cloning into '/opt/homebrew/Library/Taps/homebrew/homebrew-services'...
remote: Enumerating objects: 3246, done.
remote: Counting objects: 100% (707/707), done.
remote: Compressing objects: 100% (323/323), done.
remote: Total 3246 (delta 438), reused 566 (delta 378), pack-reused 2539 (from 1)
Receiving objects: 100% (3246/3246), 922.31 KiB | 6.11 MiB/s, done.
Resolving deltas: 100% (1579/1579), done.
Tapped 2 commands (48 files, 1MB).
==> Successfully started `mysql` (label: homebrew.mxcl.mysql)MySQL 보안 설정
MySQL 보안 설정을 위해 mysql_secure_installation 명령어를 실행하여 root 패스워드를 설정하고 기타 보안 관련 설정을 진행할 수 있습니다.
mysql_secure_installation설정을 시작하면 패스워드 복잡도 설정 여부를 묻는 메시지가 나옵니다. 보안 향상을 위해 Y를 입력합니다.
VALIDATE PASSWORD COMPONENT can be used to test passwords
and improve security. It checks the strength of password
and allows the users to set only those passwords which are
secure enough. Would you like to setup VALIDATE PASSWORD component?

Press y|Y for Yes, any other key for No:
패스워드 복잡도 레벨을 결정합니다. 8자 이상의 문자 + 숫자 + 특수 문자 조합을 사용 하기 위해 1번 MEDIUM을 선택합니다.
There are three levels of password validation policy:

LOW    Length >= 8
MEDIUM Length >= 8, numeric, mixed case, and special characters
STRONG Length >= 8, numeric, mixed case, special characters and dictionary                  file

Please enter 0 = LOW, 1 = MEDIUM and 2 = STRONG:
패스워드 복잡도에 맞게 root 계정의 패스워드를 입력합니다.
Please set the password for root here.

New password:
Re-enter new password:
패스워드 강도를 보여주고 패스워드를 그대로 사용할지 여부를 물어봅니다. 패스워드를 제대로 입력했다면 Y를 입력합니다.
Estimated strength of the password: 100
Do you wish to continue with the password provided?(Press y|Y for Yes, any other key for No) :
anonymous 유저 삭제 여부를 물어봅니다. Y를 입력하여 anonymous 유저를 삭제합니다.
Remove anonymous users? (Press y|Y for Yes, any other key for No) :외부에서 root 계정 접속을 차단할지 여부를 물어봅니다. 보통 맥북에서는 개발환경으로 사용하기 때문에 외부에서 접속할 일이 없으므로 Y를 입력합니다.
Disallow root login remotely? (Press y|Y for Yes, any other key for No) :테스트 데이터베이스를 삭제할지 물어봅니다. 테스트 데이터베이스를 사용하지 않는다면 Y를 입력합니다.
Remove test database and access to it? (Press y|Y for Yes, any other key for No) :privileges table을 갱신할지 물어봅니다. Y를 입력하여 privileges를 갱신합니다.
Reload privilege tables now? (Press y|Y for Yes, any other key for No) :MySQL 접속 테스트
root 계정으로 MySQL에 접속 가능한지 확인합니다.
mysql -u root -pEnter password:
Welcome to the MySQL monitor. Commands end with ; or \g.
Your MySQL connection id is 12
Server version: 8.3.0 Homebrew
Copyright (c) 2000, 2024, Oracle and/or its affiliates.
Oracle is a registered trademark of Oracle Corporation and/or its
affiliates. Other names may be trademarks of their respective
owners.
Type 'help;' or '\h' for help. Type '\c' to clear the current input statement.
mysql>root 패스워드를 입력 후 정상적으로 접속되면 MySQL 설치 및 설정이 완료되었습니다.
참고 자료
# 관련 포스트
# 참고 자료